实例化绘制
我们目前的场景非常简单:仅有一个以坐标 (0,0,0) 为中心的对象。如果想要绘制更多的对象呢? 这,就是实例化绘制(Instancing)的用武之地了。
实例化绘制允许我们以不同的属性(位置、方向、大小、颜色等)多次绘制同一个对象。有多种方式可以实现实例化绘制。其中一种方式是修改 Uniform 缓冲区以加入这些属性,并在绘制每个对象实例之前更新它。
出于性能原因,我们不推荐这种方式。因为逐实例更新时,uniform 缓冲区需要为每一帧复制多个缓冲区而消耗 GPU 内存带宽, 且随实例数增加的绘制命令更是会消耗 GPU 的执行时间。
如果查阅 wgpu 文档 中 draw_indexed 函数的参数 ,我们可以看到解决这一问题的方式:
pub fn draw_indexed(
    &mut self,
    indices: Range<u32>,
    base_vertex: i32,
    instances: Range<u32> // <-- 在这里
)instances 参数是范围(Range<u32>)类型的值。它命令 GPU 绘制指定对象的多少个实例。目前我们指定的是0..1,它命令 GPU 绘制 1 个实例后停止。如果使用 0..5,我们的代码就绘制 5 个实例。
instances 的范围类型可能看起来很奇怪,因为使用 1..2 仍然是绘制 1 个实例。似乎直接使用 u32 类型会更简单,对吧?这里是范围类型的原因是:有时我们不想绘制出所有对象; 有时因为其他实例可能不该出现在这一帧中而只想绘制指定部分的实例; 又或者我们正在调试某组特定的实例。
好了,现在我们知道了如何绘制 1 个对象的多个实例,那么如何告诉 wgpu 要绘制哪些指定的实例呢?我们将要用到实例缓冲区(Instance Buffer)的概念。
实例缓冲区
我们将以类似于创建 Uniform 缓冲区的方式创建一个实例缓冲区。首先,声明一个名为 Instance 的结构体:
// lib.rs
// ...

// 新增!
struct Instance {
    position: glam::Vec3,
    rotation: glam::Quat,
}四元数(Quaternion) 是一种通常用来表示旋转的数学结构。这里不会介绍它背后的数学原理(涉及虚数和 4 维空间)。如果你想深入了解四元数,这里有一篇 Wolfram Alpha 的文章。
在着色器中直接使用这些值会有麻烦,因为 WGSL 里没有四元数的数据类型。我不想在着色器中做四元数运算,所以把 Instance 数据转换成了矩阵,并将其存储在一个名为 InstanceRaw 的结构体中:
// 新增!
#[repr(C)]
#[derive(Copy, Clone, bytemuck::Pod, bytemuck::Zeroable)]
struct InstanceRaw {
    model: [[f32; 4]; 4],
}这就是将要写入缓冲区的数据。我们拆分出 InstanceRaw 之后,就可以自由地更新 Instance 而无需涉及矩阵,因为 raw 数据只需要在绘制之前更新。
让我们在 Instance 上创建一个函数来计算并返回 InstanceRaw:
// 新增!
impl Instance {
    fn to_raw(&self) -> InstanceRaw {
        InstanceRaw {
            model: (glam::Mat4::from_translation(self.position) * glam::Mat4::from_quat(self.rotation)).to_cols_array_2d(),
        }
    }
}现在需要给 WgpuApp 添加两个字段:instances 和 instance_buffer:
struct WgpuApp {
    instances: Vec<Instance>,
    instance_buffer: wgpu::Buffer,
}接下来在 new() 函数中创建实例数据,先定义几个常量用于简化代码:
const NUM_INSTANCES_PER_ROW: u32 = 10;
const INSTANCE_DISPLACEMENT: glam::Vec3 = glam::Vec3::new(NUM_INSTANCES_PER_ROW as f32 * 0.5, 0.0, NUM_INSTANCES_PER_ROW as f32 * 0.5);我们将创建一组 10 行 10 列空间排列均匀的实例数据,下边是具体代码:
impl WgpuAppAction for WgpuApp {
    async fn new(window: Arc<winit::window::Window>) -> Self {
        // ...
        let instances = (0..NUM_INSTANCES_PER_ROW).flat_map(|z| {
            (0..NUM_INSTANCES_PER_ROW).map(move |x| {
                let position = glam::Vec3 { x: x as f32, y: 0.0, z: z as f32 } - INSTANCE_DISPLACEMENT;

                let rotation = if position.length().abs() <= f32::EPSILON {
                    // 这一行特殊确保在坐标 (0, 0, 0) 处的对象不会被缩放到 0
                    // 因为错误的四元数会影响到缩放
                    glam::Quat::from_axis_angle(glam::Vec3::Z, 0.0)
                } else {
                    glam::Quat::from_axis_angle(position.normalize(), consts::FRAC_PI_4)
                };

                Instance {
                    position, rotation,
                }
            })
        }).collect::<Vec<_>>();
        // ...
    }
}现在数据已经有了,我们来创建实际的实例缓冲区:
let instance_data = instances.iter().map(Instance::to_raw).collect::<Vec<_>>();
let instance_buffer = device.create_buffer_init(
    &wgpu::util::BufferInitDescriptor {
        label: Some("Instance Buffer"),
        contents: bytemuck::cast_slice(&instance_data),
        usage: wgpu::BufferUsages::VERTEX,
    }
);需要为 InstanceRaw 创建一个新的顶点缓冲区布局:
impl InstanceRaw {
    fn desc<'a>() -> wgpu::VertexBufferLayout<'a> {
        use core::mem;
        wgpu::VertexBufferLayout {
            array_stride: mem::size_of::<InstanceRaw>() as wgpu::BufferAddress,
            // step_mode 的值需要从 Vertex 改为 Instance
            // 这意味着只有着色器开始处理一次新实例化绘制时,才会使用下一个实例数据
            step_mode: wgpu::VertexStepMode::Instance,
            attributes: &[
                wgpu::VertexAttribute {
                    offset: 0,
                    // 虽然顶点着色器现在只使用了插槽 0 和 1,但在后面的教程中将会使用 2、3 和 4
                    // 此处从插槽 5 开始,确保与后面的教程不会有冲突
                    shader_location: 5,
                    format: wgpu::VertexFormat::Float32x4,
                },
                // mat4 从技术的角度来看是由 4 个 vec4 构成,占用 4 个插槽。
                // 我们需要为每个 vec4 定义一个插槽,然后在着色器中重新组装出 mat4。
                wgpu::VertexAttribute {
                    offset: mem::size_of::<[f32; 4]>() as wgpu::BufferAddress,
                    shader_location: 6,
                    format: wgpu::VertexFormat::Float32x4,
                },
                wgpu::VertexAttribute {
                    offset: mem::size_of::<[f32; 8]>() as wgpu::BufferAddress,
                    shader_location: 7,
                    format: wgpu::VertexFormat::Float32x4,
                },
                wgpu::VertexAttribute {
                    offset: mem::size_of::<[f32; 12]>() as wgpu::BufferAddress,
                    shader_location: 8,
                    format: wgpu::VertexFormat::Float32x4,
                },
            ],
        }
    }
}我们需要将此布局添加到渲染管线中,以便在渲染时可以使用它:
let render_pipeline = device.create_render_pipeline(&wgpu::RenderPipelineDescriptor {
    // ...
    vertex: wgpu::VertexState {
        // ...
        // 更新!
        buffers: &[Some(Vertex::desc()), Some(InstanceRaw::desc())],
    },
    // ...
});别忘了要返回新增的变量:
Self {
    // ...
    // 新添加!
    instances,
    instance_buffer,
}最后,在 render() 函数中绑定 instance_buffer,并修改 draw_indexed() 绘制命令以使用我们实际的实例数:
render_pass.set_pipeline(&self.render_pipeline);
render_pass.set_bind_group(0, &self.diffuse_bind_group, &[]);
render_pass.set_bind_group(1, &self.camera_bind_group, &[]);
render_pass.set_vertex_buffer(0, self.vertex_buffer.slice(..));
// 新添加!
render_pass.set_vertex_buffer(1, self.instance_buffer.slice(..));
render_pass.set_index_buffer(self.index_buffer.slice(..), wgpu::IndexFormat::Uint16);

// 更新!
render_pass.draw_indexed(0..self.num_indices, 0, 0..self.instances.len() as _);当你向数组添加新的实例时,请确保重新创建了 instance_buffer 和 camera_bind_group,否则新实例不会正确显示。
shader.wgsl 中需要引入我们新增的矩阵,这样才能在实例中使用它。请在 shader.wgsl 文件的顶部添加以下代码:
struct InstanceInput {
    @location(5) model_matrix_0: vec4f,
    @location(6) model_matrix_1: vec4f,
    @location(7) model_matrix_2: vec4f,
    @location(8) model_matrix_3: vec4f,
};在使用之前,我们需要将矩阵重新组装出来:
@vertex
fn vs_main(
    model: VertexInput,
    instance: InstanceInput,
) -> VertexOutput {
    let model_matrix = mat4x4f(
        instance.model_matrix_0,
        instance.model_matrix_1,
        instance.model_matrix_2,
        instance.model_matrix_3,
    );
    // Continued...
}我们得在应用 camera_uniform.view_proj 之前先应用 model_matrix。因为 view_proj 将坐标系从世界空间(World Space)变换为相机空间(Camera Space),而 model_matrix 是一个世界空间的变换,所以在使用它时不希望处于相机空间。
@vertex
fn vs_main(
    model: VertexInput,
    instance: InstanceInput,
) -> VertexOutput {
    // ...
    var out: VertexOutput;
    out.tex_coords = model.tex_coords;
    out.clip_position = camera.view_proj * model_matrix * vec4f(model.position, 1.0);
    return out;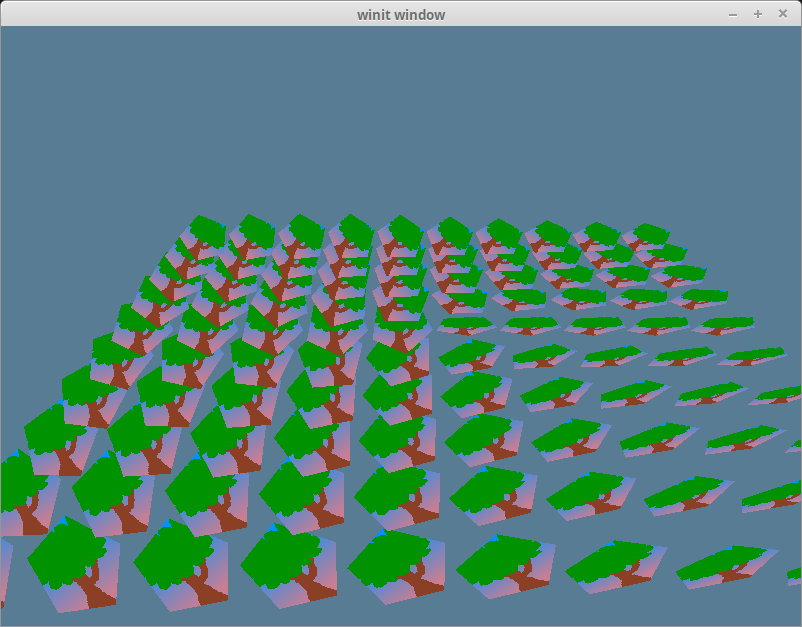
}完成后,应该就能看到一片树林了!
挑战
逐帧变更实例的位置 和/或 旋转弧度。