渲染高动态范围场景 (High Dynamic Range Rendering)
到目前为止,我们一直在使用 sRGB 色彩空间来渲染场景。虽然这样做没问题,但它限制了在场景光照方面的可能性。我们通常使用 TextureFormat::Rgba8UnormSrgb | Rgba8Unorm 作为纹理格式,这种格式的红、绿、蓝和透明度 4 个颜色通道各占 8 位(1 个字节)。通道的存储值是介于 0 和 255 之间的整数,但它们在着色器中会被转换为 0.0 到 1.0 之间的浮点值。简而言之,使用 8 位的纹理,每个通道只有 256 个可能的值。
而这 256 个可能的值之中,大部分精度被用来表示场景中较暗的值,也就是说,灯泡等明亮的物体与太阳等极其明亮的物体具有相同的值。这种不准确性使得无法实现逼真的光照效果。因此,我们将切换渲染系统以使用高动态范围 (HDR,High Dynamic Range),使场景更具灵活性,并能够利用更高级的技术,如基于物理的渲染。
什么是 HDR 纹理?
通俗地说,高动态范围纹理是一种每像素拥有更多位数的纹理。HDR 纹理以浮点数值而不是整数值存储,颜色通道可以拥有大于 1.0 的亮度值,也就是说可以拥有更高动态范围的亮度。
使用 HDR 纹理
截至目前,并非所有显示设备都支持 HDR,因此我们需要以 HDR 格式渲染场景,然后使用色调映射 (tonemapping) 将 HDR 转换为支持的格式。
这里有一些关于 wgpu 中实现 HDR 展示平面 (Surface) 纹理支持的讨论。如果你想为这块出力,可以参考 GitHub 问题链接:https://github.com/gfx-rs/wgpu/issues/2920
译者注:
wgpu 中对 HDR 的支持起始于我提交的这几个 PR:
Metal backend ASTC HDR formats support
vulkan: HDR ASTC formats support
gl: add Rgba16Float format support for color attachments。
HDR 属于广色域(WCG,Wide Color Gamut)色彩空间的内容,但是 WebGPU 标准里目前还没有支持 WCG, 而我试图率先在 metal 后端引入色彩空间 的尝试也失败了。
虽然不能在 wgpu 中直接指定广色域色彩空间, 但给 SurfaceConfiguration 设置 TextureFormat::Rgba16Float 格式时,wgpu-hal 内部会开启对应图形后端的广色域支持:

所以英文原文中说 “wgpu doesn't allow us to use a floating point format such as ...” 的说法是不对的,原文备注里给出的 GitHub 问题链接里讨论的点我也不认为是 wgpu 需要解决的。
关于如何使用 Rgba16Float, 可以参考我的另一个开源项目:wgpu-in-app/src/hdr_image_view
在开始之前,我们需要切换到使用 HDR 纹理进行渲染。
首先,创建一个名为 hdr.rs 的文件:
use wgpu::Operations;

use crate::{create_render_pipeline, texture};

/// 执有渲染纹理并控制色调映射。
pub struct HdrPipeline {
    pipeline: wgpu::RenderPipeline,
    bind_group: wgpu::BindGroup,
    texture: texture::Texture,
    width: u32,
    height: u32,
    format: wgpu::TextureFormat,
    layout: wgpu::BindGroupLayout,
}

impl HdrPipeline {
    pub fn new(device: &wgpu::Device, config: &wgpu::SurfaceConfiguration) -> Self {
        let width = config.width;
        let height = config.height;

        // 这是 WebGPU 标准中唯一可用于展示平面的**广色域**纹理格式
        let format = wgpu::TextureFormat::Rgba16Float;

        let texture = texture::Texture::create_2d_texture(
            device,
            width,
            height,
            format,
            wgpu::TextureUsages::TEXTURE_BINDING | wgpu::TextureUsages::RENDER_ATTACHMENT,
            wgpu::FilterMode::Nearest,
            Some("Hdr::texture"),
        );

        let layout = device.create_bind_group_layout(&wgpu::BindGroupLayoutDescriptor {
            label: Some("Hdr::layout"),
            entries: &[
                // HDR 纹理
                wgpu::BindGroupLayoutEntry {
                    binding: 0,
                    visibility: wgpu::ShaderStages::FRAGMENT,
                    ty: wgpu::BindingType::Texture {
                        sample_type: wgpu::TextureSampleType::Float { filterable: true },
                        view_dimension: wgpu::TextureViewDimension::D2,
                        multisampled: false,
                    },
                    count: None,
                },
                wgpu::BindGroupLayoutEntry {
                    binding: 1,
                    visibility: wgpu::ShaderStages::FRAGMENT,
                    ty: wgpu::BindingType::Sampler(wgpu::SamplerBindingType::Filtering),
                    count: None,
                },
            ],
        });
        let bind_group = device.create_bind_group(&wgpu::BindGroupDescriptor {
            label: Some("Hdr::bind_group"),
            layout: &layout,
            entries: &[
                wgpu::BindGroupEntry {
                    binding: 0,
                    resource: wgpu::BindingResource::TextureView(&texture.view),
                },
                wgpu::BindGroupEntry {
                    binding: 1,
                    resource: wgpu::BindingResource::Sampler(&texture.sampler),
                },
            ],
        });

        // We'll cover the shader next
        let shader = wgpu::include_wgsl!("hdr.wgsl");
        let pipeline_layout = device.create_pipeline_layout(&wgpu::PipelineLayoutDescriptor {
            label: None,
            bind_group_layouts: &[Some(&layout)],
            immediate_size: 0,
        });

        let pipeline = create_render_pipeline(
            device,
            &pipeline_layout,
            config.format,
            None,
            // We'll use some math to generate the vertex data in
            // the shader, so we don't need any vertex buffers
            &[],
            wgpu::PrimitiveTopology::TriangleList,
            shader,
        );

        Self {
            pipeline,
            bind_group,
            layout,
            texture,
            width,
            height,
            format,
        }
    }

    /// Resize the HDR texture
    pub fn resize(&mut self, device: &wgpu::Device, width: u32, height: u32) {
        self.texture = texture::Texture::create_2d_texture(
            device,
            width,
            height,
            wgpu::TextureFormat::Rgba16Float,
            wgpu::TextureUsages::TEXTURE_BINDING | wgpu::TextureUsages::RENDER_ATTACHMENT,
            wgpu::FilterMode::Nearest,
            Some("Hdr::texture"),
        );
        self.bind_group = device.create_bind_group(&wgpu::BindGroupDescriptor {
            label: Some("Hdr::bind_group"),
            layout: &self.layout,
            entries: &[
                wgpu::BindGroupEntry {
                    binding: 0,
                    resource: wgpu::BindingResource::TextureView(&self.texture.view),
                },
                wgpu::BindGroupEntry {
                    binding: 1,
                    resource: wgpu::BindingResource::Sampler(&self.texture.sampler),
                },
            ],
        });
        self.width = width;
        self.height = height;
    }

    /// Exposes the HDR texture
    pub fn view(&self) -> &wgpu::TextureView {
        &self.texture.view
    }

    /// The format of the HDR texture
    pub fn format(&self) -> wgpu::TextureFormat {
        self.format
    }

    /// This renders the internal HDR texture to the [TextureView]
    /// supplied as parameter.
    pub fn process(&self, encoder: &mut wgpu::CommandEncoder, output: &wgpu::TextureView) {
        let mut pass = encoder.begin_render_pass(&wgpu::RenderPassDescriptor {
            label: Some("Hdr::process"),
            color_attachments: &[Some(wgpu::RenderPassColorAttachment {
                view: &output,
                resolve_target: None,
                depth_slice: None,
                ops: Operations {
                    load: wgpu::LoadOp::Load,
                    store: wgpu::StoreOp::Store,
                },
            })],
            depth_stencil_attachment: None,
        });
        pass.set_pipeline(&self.pipeline);
        pass.set_bind_group(0, &self.bind_group, &[]);
        pass.draw(0..3, 0..1);
    }
}你可能已经注意到 create_render_pipeline 中添加了一个新的参数。下面是对该函数的更改:
fn create_render_pipeline(
    device: &wgpu::Device,
    layout: &wgpu::PipelineLayout,
    color_format: wgpu::TextureFormat,
    depth_format: Option<wgpu::TextureFormat>,
    vertex_layouts: &[wgpu::VertexBufferLayout],
    topology: wgpu::PrimitiveTopology, // NEW!
    shader: wgpu::ShaderModuleDescriptor,
) -> wgpu::RenderPipeline {
    let shader = device.create_shader_module(shader);

    device.create_render_pipeline(&wgpu::RenderPipelineDescriptor {
        // ...
        primitive: wgpu::PrimitiveState {
            topology, // NEW!
            // ...
        },
        // ...
    })
}色调映射
色调映射的过程是将 HDR 图像转换为标准动态范围(SDR),通常是 sRGB。使用的确切色调映射曲线最终取决于你的艺术需求,在本教程中,我们将使用一种广泛使用的曲线,称为 ACES(Academy Color Encoding System),在游戏行业和电影行业中广泛使用。
现在,我们来实现这个色调映射着色器。创建一个名为hdr.wgsl的文件:
// 将HDR值映射到线性值
// 基于 http://www.oscars.org/science-technology/sci-tech-projects/aces
fn aces_tone_map(hdr: vec3<f32>) -> vec3<f32> {
    let m1 = mat3x3(
        0.59719, 0.07600, 0.02840,
        0.35458, 0.90834, 0.13383,
        0.04823, 0.01566, 0.83777,
    );
    let m2 = mat3x3(
        1.60475, -0.10208, -0.00327,
        -0.53108,  1.10813, -0.07276,
        -0.07367, -0.00605,  1.07602,
    );
    let v = m1 * hdr;
    let a = v * (v + 0.0245786) - 0.000090537;
    let b = v * (0.983729 * v + 0.4329510) + 0.238081;
    return clamp(m2 * (a / b), vec3(0.0), vec3(1.0));
}

struct VertexOutput {
    @location(0) uv: vec2<f32>,
    @builtin(position) clip_position: vec4<f32>,
};

@vertex
fn vs_main(
    @builtin(vertex_index) vi: u32,
) -> VertexOutput {
    var out: VertexOutput;
    // 生成一个能覆盖整个视口的三角形
    out.uv = vec2<f32>(
        f32((vi << 1u) & 2u),
        f32(vi & 2u),
    );
    out.clip_position = vec4<f32>(out.uv * 2.0 - 1.0, 0.0, 1.0);
    // 纹理坐标是左下角为 (0, 0), 所以需要反转 y 坐标
    out.uv.y = 1.0 - out.uv.y;
    return out;
}

@group(0)
@binding(0)
var hdr_image: texture_2d<f32>;

@group(0)
@binding(1)
var hdr_sampler: sampler;

@fragment
fn fs_main(vs: VertexOutput) -> @location(0) vec4<f32> {
    let hdr = textureSample(hdr_image, hdr_sampler, vs.uv);
    let sdr = aces_tone_map(hdr.rgb);
    return vec4(sdr, hdr.a);
}准备好上面这些,就可以开始在核心渲染管线中使用我们的 HDR 纹理了。首先,需要将新的 HdrPipeline 添加到 WgpuApp 中:
// lib.rs

mod hdr; // NEW!

struct WgpuApp {
    // ...
    // NEW!
    hdr: hdr::HdrPipeline,
}

impl WgpuAppAction for WgpuApp {
    async fn new(window: Arc<winit::window::Window>) -> Self {
        // ...
        // NEW!
        let hdr = hdr::HdrPipeline::new(&device, &config);

        Self {
            // ...
            hdr, // NEW!
        }
    }
}当窗口大小发生变化时,还需要在 HdrPipeline 上调用 resize() 函数:
fn resize_surface_if_needed(&mut self) {
    if self.size_changed {
        //...
        self.hdr
            .resize(&self.device, self.size.width, self.size.height);
        // ...
    }
}接下来,在 render() 函数中,需要将 RenderPass 切换为使用 HDR 纹理:
// render()
let mut render_pass = encoder.begin_render_pass(&wgpu::RenderPassDescriptor {
    label: Some("Render Pass"),
    color_attachments: &[Some(wgpu::RenderPassColorAttachment {
        view: self.hdr.view(), // 这里有变更!
        resolve_target: None,
        depth_slice: None,
        ops: wgpu::Operations {
            load: wgpu::LoadOp::Clear(wgpu::Color {
                r: 0.1,
                g: 0.2,
                b: 0.3,
                a: 1.0,
            }),
            store: wgpu::StoreOp::Store,
        },
    })],
    depth_stencil_attachment: Some(
        // ...
    ),
});最后,使用展示平面(Surface)作为输出来应用我们的色调映射器:
// 应用色调映射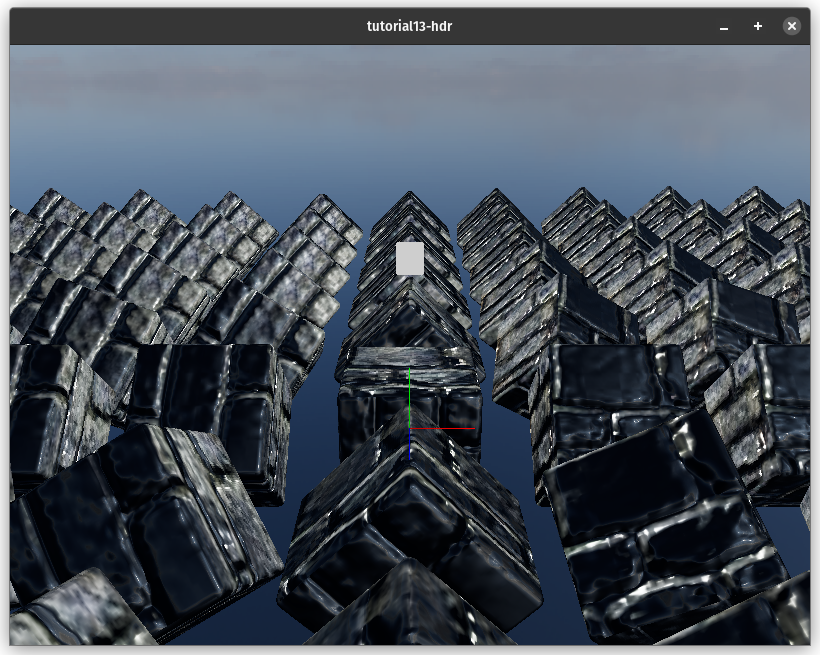
self.hdr.process(&mut encoder, &view);这是在使用 HDR 之前的图像:
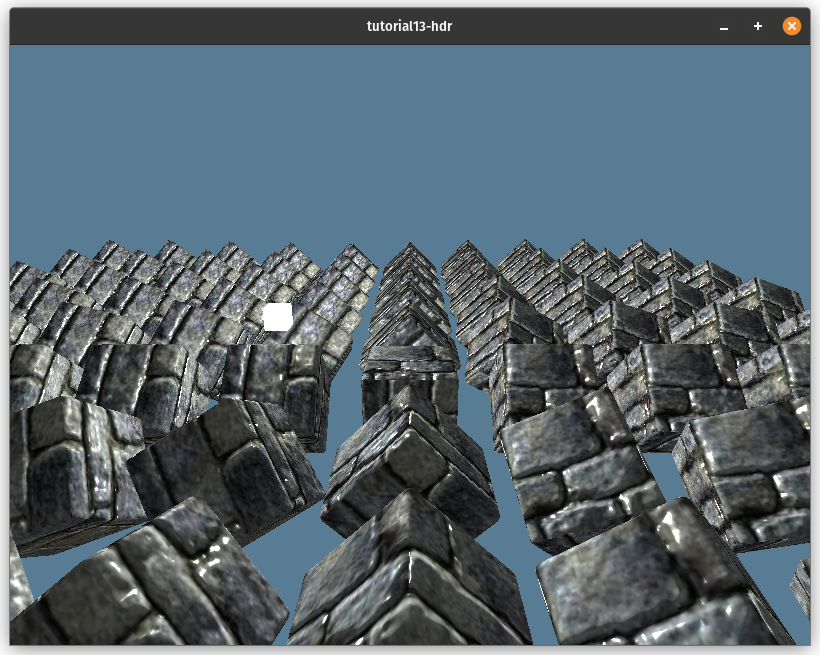
实现 HDR 之后的效果:

加载 HDR 纹理
现在我们有了一个 HDR 渲染缓冲区,可以充分利用 HDR 纹理。HDR 纹理的主要用途之一是以环境贴图的形式存储光照信息。
这个贴图可以用来照亮物体,显示反射,并且还可以制作天空盒。我们将使用 HDR 纹理创建一个天空盒,但首先,需要讨论环境贴图的存储方式。
等距矩形纹理
等距矩形 (Equirectangular) 纹理是球体通过所谓的等距矩形投影被拉伸到一个矩形表面上的一种纹理。世界地图就是这种投影的一个例子:

这种投影将球体的纬度值映射到纹理的水平坐标上, 经度值被映射到垂直坐标上。这意味着纹理的垂直中间是球体的赤道(0° 经度),水平中间是球体的本初子午线(0° 纬度),纹理的左右边缘是反子午线(+180°/-180° 纬度),顶部和底部边缘分别是北极(90° 经度)和南极(-90° 经度):

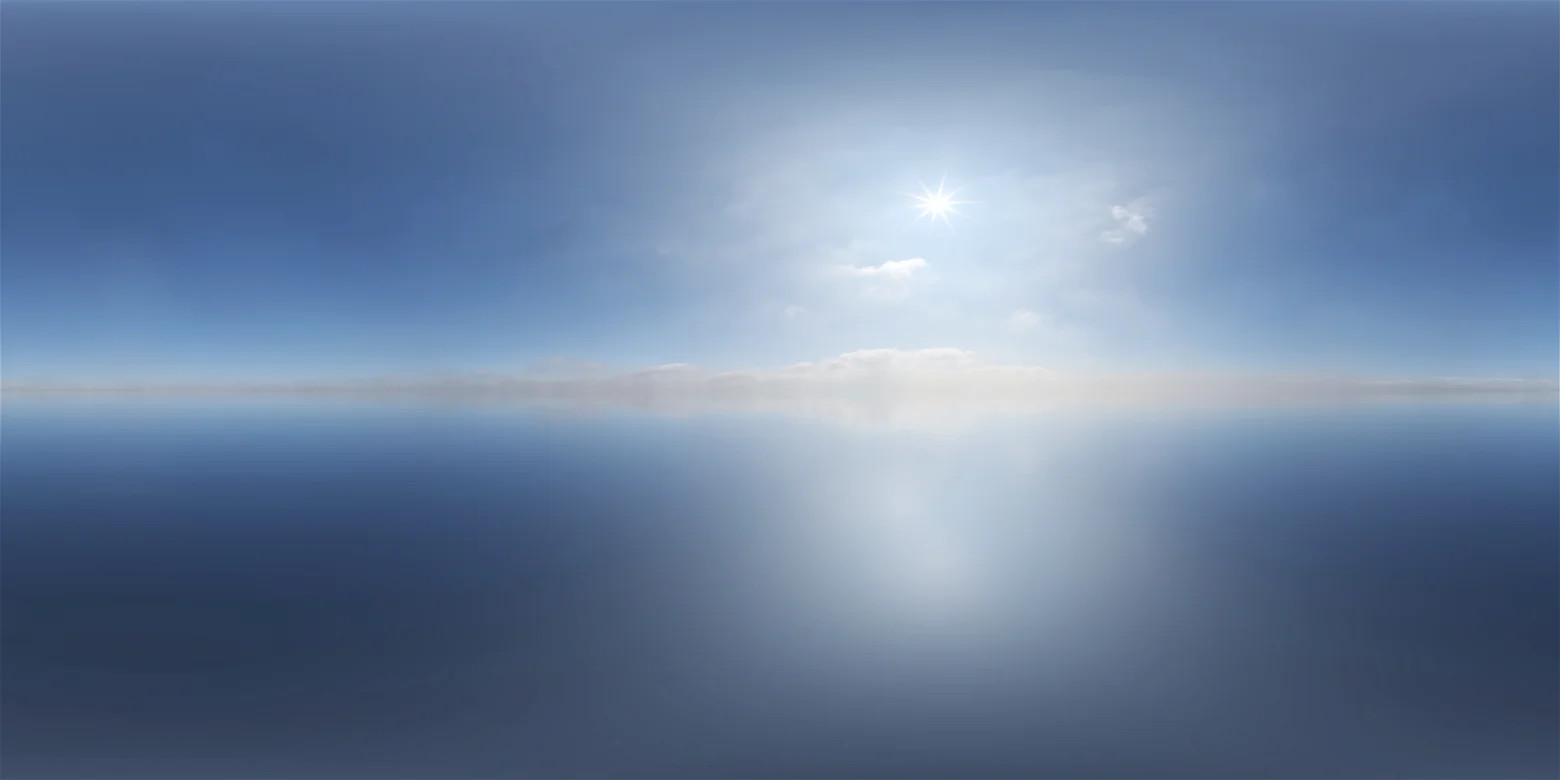
这种投影易于使用,使其成为存储球形纹理最受欢迎的投影之一。下面这张我们将要使用的的环境贴图就是运用等距矩形投影所生成:
立方体贴图
虽然在技术上可以直接使用等距矩形贴图,只要进行一些数学计算来确定正确的坐标,但将环境贴图转换为立方体贴图会更加方便。
立方体贴图是一种特殊类型的纹理,它有六个层(Layer)。每个层对应于一个与 X、Y 和 Z 轴对齐的虚拟立方体的不同面。这些层按照以下顺序存储:+X,-X,+Y,-Y,+Z,-Z。
为了准备存储立方体纹理,我们在 texture.rs 中创建一个名为 CubeTexture 的新结构体。
pub struct CubeTexture {
    texture: wgpu::Texture,
    sampler: wgpu::Sampler,
    view: wgpu::TextureView,
}

impl CubeTexture {
    pub fn create_2d(
        device: &wgpu::Device,
        width: u32,
        height: u32,
        format: wgpu::TextureFormat,
        mip_level_count: u32,
        usage: wgpu::TextureUsages,
        mag_filter: wgpu::FilterMode,
        label: Option<&str>,
    ) -> Self {
        let texture = device.create_texture(&wgpu::TextureDescriptor {
            label,
            size: wgpu::Extent3d {
                width,
                height,
                // A cube has 6 sides, so we need 6 layers
                depth_or_array_layers: 6,
            },
            mip_level_count,
            sample_count: 1,
            dimension: wgpu::TextureDimension::D2,
            format,
            usage,
            view_formats: &[],
        });

        let view = texture.create_view(&wgpu::TextureViewDescriptor {
            label,
            dimension: Some(wgpu::TextureViewDimension::Cube),
            array_layer_count: Some(6),
            ..Default::default()
        });

        let sampler = device.create_sampler(&wgpu::SamplerDescriptor {
            label,
            address_mode_u: wgpu::AddressMode::ClampToEdge,
            address_mode_v: wgpu::AddressMode::ClampToEdge,
            address_mode_w: wgpu::AddressMode::ClampToEdge,
            mag_filter,
            min_filter: wgpu::FilterMode::Nearest,
            mipmap_filter: wgpu::MipmapFilterMode::Nearest,
            ..Default::default()
        });

        Self {
            texture,
            sampler,
            view,
        }
    }
    // ...
}现在, 我们可以编写代码将 HDR 加载到立方体纹理中了。
计算管线
计算管线(ComputePipeline)的设置相比渲染管线要简单得多,只需要告诉管线想要使用的资源、要运行的代码以及在运行代码时希望 GPU 使用的线程数。
计算管线的详细教程,请阅读计算管线章节.
我们将使用计算着色器 (Compute shader) 为立方体纹理中的每个像素赋予来自 HDR 图像的颜色,先在 wgpu 中启用 WebGPU 的 feature:
let (device, queue) = adapter
    .request_device(
        &wgpu::DeviceDescriptor {
            label: None,
            // 这里是变更!
            required_features: wgpu::Features::all_webgpu_mask(),
            required_limits: wgpu::Limits::downlevel_defaults(),
            experimental_features: wgpu::ExperimentalFeatures::disabled(),
            memory_hints: wgpu::MemoryHints::Performance,
            trace: wgpu::Trace::Off,
    }
    )
    .await
.unwrap();你可能已经注意到,我们已经从 downlevel_webgl2_defaults() 切换到downlevel_defaults(),这意味着不再支持 WebGL。原因是 WebGL 不支持计算管线,WebGPU 是为计算管线而构建的。
因此,我们将从 Cargo.toml 中删除 WebGL 功能,就是下边这一行:
wgpu = { version = "29", features = ["webgl"]}上面已经设置好了 wgpu 来使用计算着色器,现在,在 resource.rs 中创建一个结构体,用于将 HDR 图像加载到立方体贴图中。
pub struct HdrLoader {
    texture_format: wgpu::TextureFormat,
    equirect_layout: wgpu::BindGroupLayout,
    equirect_to_cubemap: wgpu::ComputePipeline,
}

impl HdrLoader {
    pub fn new(device: &wgpu::Device) -> Self {
        let module = device.create_shader_module(wgpu::include_wgsl!("equirectangular.wgsl"));
        let texture_format = wgpu::TextureFormat::Rgba32Float;
        let equirect_layout = device.create_bind_group_layout(&wgpu::BindGroupLayoutDescriptor {
            label: Some("HdrLoader::equirect_layout"),
            entries: &[
                wgpu::BindGroupLayoutEntry {
                    binding: 0,
                    visibility: wgpu::ShaderStages::COMPUTE,
                    ty: wgpu::BindingType::Texture {
                        sample_type: wgpu::TextureSampleType::Float { filterable: false },
                        view_dimension: wgpu::TextureViewDimension::D2,
                        multisampled: false,
                    },
                    count: None,
                },
                wgpu::BindGroupLayoutEntry {
                    binding: 1,
                    visibility: wgpu::ShaderStages::COMPUTE,
                    ty: wgpu::BindingType::StorageTexture {
                        access: wgpu::StorageTextureAccess::WriteOnly,
                        format: texture_format,
                        view_dimension: wgpu::TextureViewDimension::D2Array,
                    },
                    count: None,
                },
            ],
        });

        let pipeline_layout = device.create_pipeline_layout(&wgpu::PipelineLayoutDescriptor {
            label: None,
            bind_group_layouts: &[Some(&equirect_layout)],
            immediate_size: 0,
        });

        let equirect_to_cubemap =
            device.create_compute_pipeline(&wgpu::ComputePipelineDescriptor {
                label: Some("equirect_to_cubemap"),
                layout: Some(&pipeline_layout),
                module: &module,
                entry_point: Some("compute_equirect_to_cubemap"),
                compilation_options: Default::default(),
                cache: None,
            });

        Self {
            equirect_to_cubemap,
            texture_format,
            equirect_layout,
        }
    }

    pub fn from_equirectangular_bytes(
        &self,
        device: &wgpu::Device,
        queue: &wgpu::Queue,
        data: &[u8],
        dst_size: u32,
        label: Option<&str>,
    ) -> anyhow::Result<texture::CubeTexture> {
        let hdr_decoder = HdrDecoder::new(Cursor::new(data))?;
        let meta = hdr_decoder.metadata();
        let mut pixels = vec![[0.0, 0.0, 0.0, 0.0]; meta.width as usize * meta.height as usize];
        hdr_decoder.read_image_transform(
            |pix| {
                // There's no Rgb32Float format, so we need
                // an extra float
                let rgb = pix.to_hdr();
                [rgb.0[0], rgb.0[1], rgb.0[2], 1.0f32]
            },
            &mut pixels[..],
        )?;

        let src = texture::Texture::create_2d_texture(
            device,
            meta.width,
            meta.height,
            self.texture_format,
            wgpu::TextureUsages::TEXTURE_BINDING | wgpu::TextureUsages::COPY_DST,
            wgpu::FilterMode::Linear,
            None,
        );

        queue.write_texture(
            wgpu::TexelCopyTextureInfo {
                texture: &src.texture,
                mip_level: 0,
                origin: wgpu::Origin3d::ZERO,
                aspect: wgpu::TextureAspect::All,
            },
            &bytemuck::cast_slice(&pixels),
            wgpu::TexelCopyBufferLayout {
                offset: 0,
                bytes_per_row: Some(src.size.width * core::mem::size_of::<[f32; 4]>() as u32),
                rows_per_image: Some(src.size.height),
            },
            src.size,
        );

        let dst = texture::CubeTexture::create_2d(
            device,
            dst_size,
            dst_size,
            self.texture_format,
            1,
            // We are going to write to `dst` texture so we
            // need to use a `STORAGE_BINDING`.
            wgpu::TextureUsages::STORAGE_BINDING
                | wgpu::TextureUsages::TEXTURE_BINDING,
            wgpu::FilterMode::Nearest,
            label,
        );

        let dst_view = dst.texture().create_view(&wgpu::TextureViewDescriptor {
            label,
            dimension: Some(wgpu::TextureViewDimension::D2Array),
            ..Default::default()
        });

        let bind_group = device.create_bind_group(&wgpu::BindGroupDescriptor {
            label,
            layout: &self.equirect_layout,
            entries: &[
                wgpu::BindGroupEntry {
                    binding: 0,
                    resource: wgpu::BindingResource::TextureView(&src.view),
                },
                wgpu::BindGroupEntry {
                    binding: 1,
                    resource: wgpu::BindingResource::TextureView(&dst_view),
                },
            ],
        });

        let mut encoder = device.create_command_encoder(&Default::default());
        let mut pass = encoder.begin_compute_pass(&wgpu::ComputePassDescriptor { label });

        let num_workgroups = (dst_size + 15) / 16;
        pass.set_pipeline(&self.equirect_to_cubemap);
        pass.set_bind_group(0, &bind_group, &[]);
        pass.dispatch_workgroups(num_workgroups, num_workgroups, 6);

        drop(pass);

        queue.submit([encoder.finish()]);

        Ok(dst)
    }
}dispatch_workgroups 调用告诉 GPU 以批处理的方式运行我们的代码,每个批处理称为工作组。每个工作组都有一些称为调用的工作线程,可以并行运行代码。工作组以我们传递给 dispatch_workgroups 的维度组织成一个三维网格。
对工作组的详讲解,请阅读计算管线/工作组章节.
在这个例子中,我们将工作组网格划分为 16x16 的块,并将图层存储在 z 维度中。
计算着色器
现在,开始编写计算着色器(Compute Shader),将我们的等距矩形纹理转换为立方体纹理。先创建一个名为equirectangular.wgsl的文件:
const PI: f32 = 3.1415926535897932384626433832795;

struct Face {
    forward: vec3<f32>,
    up: vec3<f32>,
    right: vec3<f32>,
}这里有两个要注意的地方:
- WGSL 没有内置的 PI 常量,所以我们需要自己指定它。
- 立方体贴图的每个面都有一个方向,所以我们需要存储它。
@group(0)
@binding(0)
var src: texture_2d<f32>;

@group(0)
@binding(1)
var dst: texture_storage_2d_array<rgba32float, write>;这里需要两个绑定: 等距矩形的 src 纹理和我们的 dst 立方体纹理。关于 dst 的一些注意事项:
- 虽然
dst是一个立方体纹理,但它以 2D 纹理数组的形式存储。 - 这里使用的绑定类型是存储纹理(Storage Texture)。准确地说,是数组存储纹理。这是仅适用于计算着色器的独特绑定, 它允许我们直接写入纹理。
- 当使用存储纹理绑定时,需要指定纹理的格式。如果尝试绑定具有不同格式的纹理,wgpu 将会报错。
@compute
@workgroup_size(16, 16, 1)
fn compute_equirect_to_cubemap(
    @builtin(global_invocation_id)
    gid: vec3<u32>,
) {
    // 如果纹理大小不能被 32 整除,需要避免尝试写入不存在的像素。
    if gid.x >= u32(textureDimensions(dst).x) {
        return;
    }

    var FACES: array<Face, 6> = array(
        // FACES +X
        Face(
            vec3(1.0, 0.0, 0.0),  // forward
            vec3(0.0, 1.0, 0.0),  // up
            vec3(0.0, 0.0, -1.0), // right
        ),
        // FACES -X
        Face (
            vec3(-1.0, 0.0, 0.0),
            vec3(0.0, 1.0, 0.0),
            vec3(0.0, 0.0, 1.0),
        ),
        // FACES +Y
        Face (
            vec3(0.0, -1.0, 0.0),
            vec3(0.0, 0.0, 1.0),
            vec3(1.0, 0.0, 0.0),
        ),
        // FACES -Y
        Face (
            vec3(0.0, 1.0, 0.0),
            vec3(0.0, 0.0, -1.0),
            vec3(1.0, 0.0, 0.0),
        ),
        // FACES +Z
        Face (
            vec3(0.0, 0.0, 1.0),
            vec3(0.0, 1.0, 0.0),
            vec3(1.0, 0.0, 0.0),
        ),
        // FACES -Z
        Face (
            vec3(0.0, 0.0, -1.0),
            vec3(0.0, 1.0, 0.0),
            vec3(-1.0, 0.0, 0.0),
        ),
    );

    // 获取相对于立方体贴图面的纹理坐标
    let dst_dimensions = vec2<f32>(textureDimensions(dst));
    let cube_uv = vec2<f32>(gid.xy) / dst_dimensions * 2.0 - 1.0;

    // 从 cube_uv 获取球面坐标
    let face = FACES[gid.z];
    let spherical = normalize(face.forward + face.right * cube_uv.x + face.up * cube_uv.y);

    // 获取等距矩形纹理上的坐标
    let inv_atan = vec2(0.1591, 0.3183);
    let eq_uv = vec2(atan2(spherical.z, spherical.x), asin(spherical.y)) * inv_atan + 0.5;
    let eq_pixel = vec2<i32>(eq_uv * vec2<f32>(textureDimensions(src)));

    // 在计算着色器中需要使用 textureLoad(),
    // 因为 textureSample()是不允许的。
    var sample = textureLoad(src, eq_pixel, 0);

    textureStore(dst, gid.xy, gid.z, sample);
}现在,可以在 new() 函数中加载环境贴图了:
let hdr_loader = resources::HdrLoader::new(&device);
let sky_bytes = resources::load_binary("pure-sky.hdr").await?;
let sky_texture = hdr_loader.from_equirectangular_bytes(
    &device,
    &queue,
    &sky_bytes,
    1080,
    Some("Sky Texture"),
)?;天空盒
有了环境贴图(Environment Map),让我们用它来制作天空盒(Skybox)。有不同的方法可以渲染天空盒,一种常见的方法是渲染一个立方体,并将环境贴图映射到它上面。虽然这种方法有效,但在立方体面相交的角落和边缘可能会出现一些伪影。
我们采用的方法是将其渲染到整个屏幕。计算每个像素的视线方向,并使用它来采样纹理。
首先,需要为环境贴图创建一个绑定组,以便可以在渲染中使用它。将以下内容添加到 new() 函数中:
let environment_layout =
    device.create_bind_group_layout(&wgpu::BindGroupLayoutDescriptor {
        label: Some("environment_layout"),
        entries: &[
            wgpu::BindGroupLayoutEntry {
                binding: 0,
                visibility: wgpu::ShaderStages::FRAGMENT,
                ty: wgpu::BindingType::Texture {
                    sample_type: wgpu::TextureSampleType::Float { filterable: false },
                    view_dimension: wgpu::TextureViewDimension::Cube,
                    multisampled: false,
                },
                count: None,
            },
            wgpu::BindGroupLayoutEntry {
                binding: 1,
                visibility: wgpu::ShaderStages::FRAGMENT,
                ty: wgpu::BindingType::Sampler(wgpu::SamplerBindingType::NonFiltering),
                count: None,
            },
        ],
    });

let environment_bind_group = device.create_bind_group(&wgpu::BindGroupDescriptor {
    label: Some("environment_bind_group"),
    layout: &environment_layout,
    entries: &[
        wgpu::BindGroupEntry {
            binding: 0,
            resource: wgpu::BindingResource::TextureView(&sky_texture.view()),
        },
        wgpu::BindGroupEntry {
            binding: 1,
            resource: wgpu::BindingResource::Sampler(sky_texture.sampler()),
        },
    ],
});创建好了绑定组,现在需要一个渲染管线来渲染天空盒:
// NEW!
let sky_pipeline = {
    let layout = device.create_pipeline_layout(&wgpu::PipelineLayoutDescriptor {
        label: Some("Sky Pipeline Layout"),
        bind_group_layouts: &[Some(&camera_bind_group_layout), Some(&environment_layout)],
        immediate_size: 0,
    });
    let shader = wgpu::include_wgsl!("sky.wgsl");
    create_render_pipeline(
        &device,
        &layout,
        hdr.format(),
        Some(texture::Texture::DEPTH_FORMAT),
        &[],
        wgpu::PrimitiveTopology::TriangleList,
        shader,
    )
};这里需要注意一点。我们在 create_render_pipeline() 函数中添加了图元格式。此外,将深度比较函数更改为了 CompareFunction::LessEqual(将在讨论天空着色器时解释原因)。以下是对此的更改:
fn create_render_pipeline(
    device: &wgpu::Device,
    layout: &wgpu::PipelineLayout,
    color_format: wgpu::TextureFormat,
    depth_format: Option<wgpu::TextureFormat>,
    vertex_layouts: &[wgpu::VertexBufferLayout],
    topology: wgpu::PrimitiveTopology, // 新增!
    shader: wgpu::ShaderModuleDescriptor,
) -> wgpu::RenderPipeline {
    let shader = device.create_shader_module(shader);

    device.create_render_pipeline(&wgpu::RenderPipelineDescriptor {
        // ...
        primitive: wgpu::PrimitiveState {
            topology, // NEW!
            // ...
        },
        depth_stencil: depth_format.map(|format| wgpu::DepthStencilState {
            format,
            depth_write_enabled: Some(true),
            depth_compare: Some(wgpu::CompareFunction::LessEqual), // 这里有更新!
            stencil: wgpu::StencilState::default(),
            bias: wgpu::DepthBiasState::default(),
        }),
        // ...
    })
}不要忘记将新的绑定组和渲染管线添加到 WgpuApp 中:
struct WgpuApp {
    // ...
    // NEW!
    hdr: hdr::HdrPipeline,
    environment_bind_group: wgpu::BindGroup,
    sky_pipeline: wgpu::RenderPipeline,
}现在我们来看一下 sky.wgsl 着色器的代码:
struct Camera {
    view_pos: vec4<f32>,
    view: mat4x4<f32>,
    view_proj: mat4x4<f32>,
    inv_proj: mat4x4<f32>,
    inv_view: mat4x4<f32>,
}
@group(0) @binding(0)
var<uniform> camera: Camera;

@group(1)
@binding(0)
var env_map: texture_cube<f32>;
@group(1)
@binding(1)
var env_sampler: sampler;

struct VertexOutput {
    @builtin(position) frag_position: vec4<f32>,
    @location(0) clip_position: vec4<f32>,
}

@vertex
fn vs_main(
    @builtin(vertex_index) id: u32,
) -> VertexOutput {
    let uv = vec2<f32>(vec2<u32>(
        id & 1u,
        (id >> 1u) & 1u,
    ));
    var out: VertexOutput;
    // out.clip_position = vec4(uv * vec2(4.0, -4.0) + vec2(-1.0, 1.0), 0.0, 1.0);
    out.clip_position = vec4(uv * 4.0 - 1.0, 1.0, 1.0);
    out.frag_position = vec4(uv * 4.0 - 1.0, 1.0, 1.0);
    return out;
}

@fragment
fn fs_main(in: VertexOutput) -> @location(0) vec4<f32> {
    let view_pos_homogeneous = camera.inv_proj * in.clip_position;
    let view_ray_direction = view_pos_homogeneous.xyz / view_pos_homogeneous.w;
    var ray_direction = normalize((camera.inv_view * vec4(view_ray_direction, 0.0)).xyz);

    let sample = textureSample(env_map, env_sampler, ray_direction);
    return sample;
}逐步解释一下上面的着色器代码:
- 在顶点着色器中,创建了一个长宽是视口尺寸两倍的三角形,使其刚好覆盖整个视口。
- 在片段着色器中,我们从裁剪空间坐标获取视图方向。使用逆投影矩阵将裁剪空间坐标转换为视图方向。然后,使用逆视图矩阵将方向转换到世界空间,这是正确采样天空盒所需的。
- 然后,使用视图方向对天空纹理进行采样。
为了使其工作,还需要稍微修改下相机 uniform 变量,需要将逆视图矩阵和逆投影矩阵添加到 CameraUniform 结构体中:
#[repr(C)]
#[derive(Copy, Clone, bytemuck::Pod, bytemuck::Zeroable)]
struct CameraUniform {
    view_position: [f32; 4],
    view: [[f32; 4]; 4], // 新增!
    view_proj: [[f32; 4]; 4],
    inv_proj: [[f32; 4]; 4], // 新增!
    inv_view: [[f32; 4]; 4], // 新增!
}

impl CameraUniform {
    fn new() -> Self {
        Self {
            view_position: [0.0; 4],
            view: glam::Mat4::IDENTITY.to_cols_array_2d(),
            view_proj: glam::Mat4::IDENTITY.to_cols_array_2d(),
            inv_proj: glam::Mat4::IDENTITY.to_cols_array_2d(), // NEW!
            inv_view: glam::Mat4::IDENTITY.to_cols_array_2d(), // NEW!
        }
    }

    // 这里是变更
    fn update_view_proj(&mut self, camera: &camera::Camera, projection: &camera::Projection) {
        self.view_position = camera.position.extend(1.0).into();
        let proj = projection.calc_matrix();
        let view = camera.calc_matrix();
        let view_proj = proj * view;
        self.view = view.to_cols_array_2d();
        self.view_proj = view_proj.to_cols_array_2d();
        self.inv_proj = proj.inverse().to_cols_array_2d();
        self.inv_view = view.transpose().to_cols_array_2d();
    }
}请记得在 shader.wgsl 和 light.wgsl 中也要更改 Camera 的定义,它的样子是这样的:
struct Camera {
    view_pos: vec4<f32>,
    view: mat4x4<f32>,
    view_proj: mat4x4<f32>,
    inv_proj: mat4x4<f32>,
    inv_view: mat4x4<f32>,
}
var<uniform> camera: Camera;反射
现在有了天空盒,我们可以尝试使用它来进行光照,这不会是物理上准确的光照。话虽如此,我们还是可以好好利用环境贴图。
为了实现这一点,需要修改着色器,以便在世界空间而不是切线空间中进行光照,因为我们的环境贴图是在世界空间中的。由于有很多改变,这里贴出了完整的着色器代码:
// Vertex shader

struct Camera {
    view_pos: vec4<f32>,
    view: mat4x4<f32>,
    view_proj: mat4x4<f32>,
    inv_proj: mat4x4<f32>,
    inv_view: mat4x4<f32>,
}
@group(0) @binding(0)
var<uniform> camera: Camera;

struct Light {
    position: vec3<f32>,
    color: vec3<f32>,
}
@group(2) @binding(0)
var<uniform> light: Light;

struct VertexInput {
    @location(0) position: vec3<f32>,
    @location(1) tex_coords: vec2<f32>,
    @location(2) normal: vec3<f32>,
    @location(3) tangent: vec3<f32>,
    @location(4) bitangent: vec3<f32>,
}
struct InstanceInput {
    @location(5) model_matrix_0: vec4<f32>,
    @location(6) model_matrix_1: vec4<f32>,
    @location(7) model_matrix_2: vec4<f32>,
    @location(8) model_matrix_3: vec4<f32>,
    @location(9) normal_matrix_0: vec3<f32>,
    @location(10) normal_matrix_1: vec3<f32>,
    @location(11) normal_matrix_2: vec3<f32>,
}

struct VertexOutput {
    @builtin(position) clip_position: vec4<f32>,
    @location(0) tex_coords: vec2<f32>,
    // Updated!
    @location(1) world_position: vec3<f32>,
    @location(2) world_view_position: vec3<f32>,
    @location(3) world_light_position: vec3<f32>,
    @location(4) world_normal: vec3<f32>,
    @location(5) world_tangent: vec3<f32>,
    @location(6) world_bitangent: vec3<f32>,
}

@vertex
fn vs_main(
    model: VertexInput,
    instance: InstanceInput,
) -> VertexOutput {
    let model_matrix = mat4x4<f32>(
        instance.model_matrix_0,
        instance.model_matrix_1,
        instance.model_matrix_2,
        instance.model_matrix_3,
    );
    let normal_matrix = mat3x3<f32>(
        instance.normal_matrix_0,
        instance.normal_matrix_1,
        instance.normal_matrix_2,
    );

    // 这里是变更!
    let world_position = model_matrix * vec4<f32>(model.position, 1.0);

    var out: VertexOutput;
    out.clip_position = camera.view_proj * world_position;
    out.tex_coords = model.tex_coords;
    out.world_normal = normalize(normal_matrix * model.normal);
    out.world_tangent = normalize(normal_matrix * model.tangent);
    out.world_bitangent = normalize(normal_matrix * model.bitangent);
    out.world_position = world_position.xyz;
    out.world_view_position = camera.view_pos.xyz;
    return out;
}

// Fragment shader

@group(0) @binding(0)
var t_diffuse: texture_2d<f32>;
@group(0)@binding(1)
var s_diffuse: sampler;
@group(0)@binding(2)
var t_normal: texture_2d<f32>;
@group(0) @binding(3)
var s_normal: sampler;

@group(3)
@binding(0)
var env_map: texture_cube<f32>;
@group(3)
@binding(1)
var env_sampler: sampler;

@fragment
fn fs_main(in: VertexOutput) -> @location(0) vec4<f32> {
    let object_color: vec4<f32> = textureSample(t_diffuse, s_diffuse, in.tex_coords);
    let object_normal: vec4<f32> = textureSample(t_normal, s_normal, in.tex_coords);

    // 新增!
    // 使用 Gramm-Schmidt 过程调整切线和副切线
    // 这样可以确保它们彼此垂直,并且垂直于表面的法线。
    let world_tangent = normalize(in.world_tangent - dot(in.world_tangent, in.world_normal) * in.world_normal);
    let world_bitangent = cross(world_tangent, in.world_normal);

    // Convert the normal sample to world space
    let TBN = mat3x3(
        world_tangent,
        world_bitangent,
        in.world_normal,
    );
    let tangent_normal = object_normal.xyz * 2.0 - 1.0;
    let world_normal = TBN * tangent_normal;

    // Create the lighting vectors
    let light_dir = normalize(light.position - in.world_position);
    let view_dir = normalize(in.world_view_position - in.world_position);
    let half_dir = normalize(view_dir + light_dir);

    let diffuse_strength = max(dot(world_normal, light_dir), 0.0);
    let diffuse_color = light.color * diffuse_strength;

    let specular_strength = pow(max(dot(world_normal, half_dir), 0.0), 32.0);
    let specular_color = specular_strength * light.color;

    // NEW!
    // 计算反射
    let world_reflect = reflect(-view_dir, world_normal);
    let reflection = textureSample(env_map, env_sampler, world_reflect).rgb;
    let shininess = 0.1;

    let result = (diffuse_color + specular_color) * object_color.xyz + reflection * shininess;

    return vec4<f32>(result, object_color.a);
}A little note on the reflection math. The view_dir gives us the direction to the camera from the surface. The reflection math needs the direction from the camera to the surface, so we negate view_dir. We then use wgsl's built-in reflect function to reflect the inverted view_dir about the world_normal. This gives us a direction that we can use to sample the environment map and get the color of the sky in that direction. Just looking at the reflection component gives us the following:
关于反射计算的一点说明:view_dir 给出了从屏幕到相机的方向。反射计算需要从相机到屏幕的方向,因此需要对 view_dir 取反。然后,使用 wgsl 内置的 reflect 函数将取反的 view_dir 关于 world_normal 进行反射,得到一个反射方向,我们使用它来采样环境贴图并获取该方向上的天空颜色。
仅查看反射分量的效果:
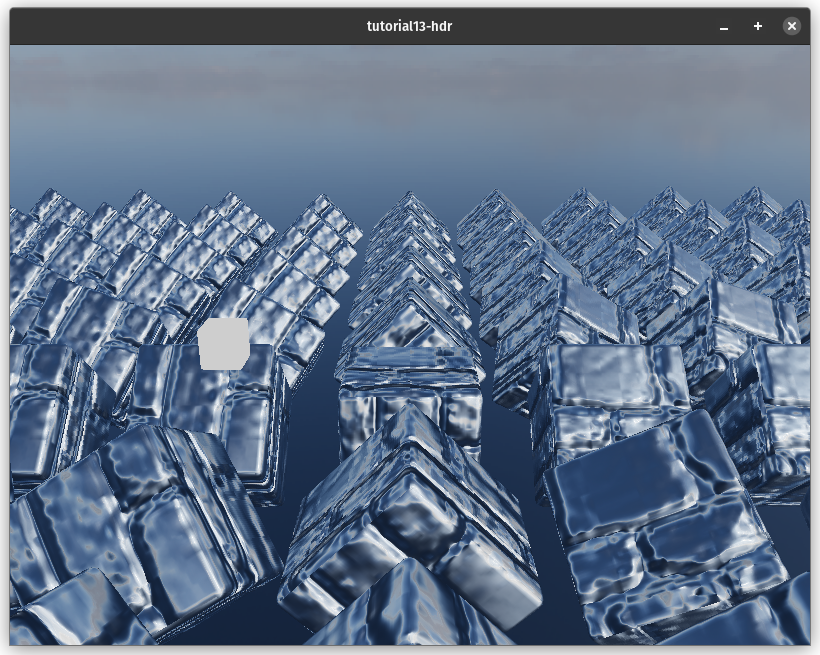
最终场景效果: