深度缓冲区
让我们换个摄像机角度来仔细观察上个教程中的例子:
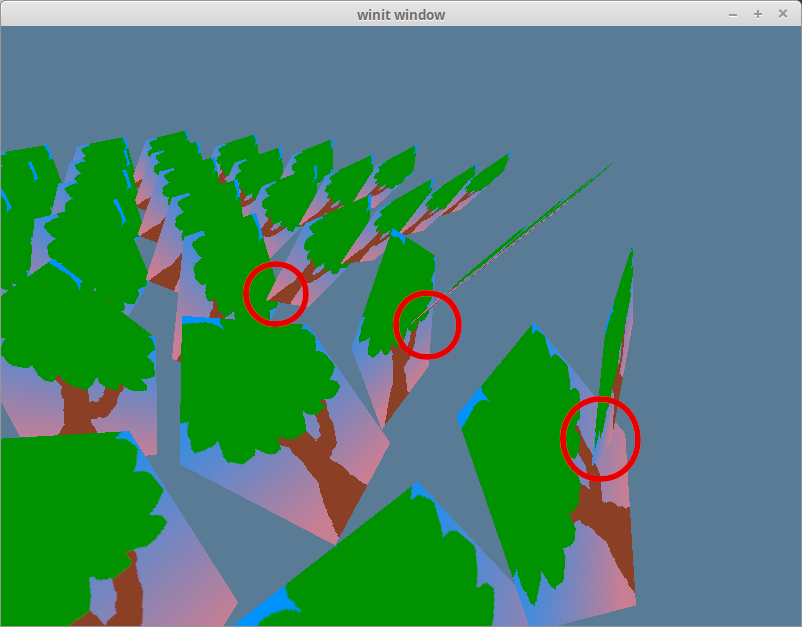
应该排在后面的对象被渲染在了前面的对象之前。这是由绘制顺序引起的。默认情况下,新对象的像素数据将取代帧缓冲区(FrameBuffer)相同坐标上旧的像素数据。
有两种方式可以解决这个问题:将数据从后往前排序; 或者使用深度缓冲区(Depth Buffer)。
从后往前排序
这是 2D 渲染的常用方法,因为很容易计算绘制对象的前后关系,甚至可以直接使用 Z 轴顺序。而在 3D 渲染中就有点棘手了,因为对象的前后关系会根据摄像机的角度而改变。
一个简单的方法是按照对象与摄像机的距离来排序。但这种方法也有缺陷,因为当大对象的模型中心坐标处在小对象后面时,大对象中本应在小对象前面的部分也会被渲染到后面。我们还会遇到对象本身重叠的问题。
如果想正确地实现绘制对象的前后关系,就需要有像素级的精度。这,就是 深度缓冲区 的作用。
像素深度
深度缓冲区是一个用来存储已渲染像素的 Z 轴坐标的纹理。在绘制新的像素时,wgpu 使用它来决定是替换数据还是丢弃。这种技术被称为深度测试,它将解决绘制顺序问题,而不需要我们对绘制对象进行排序!
让我们在 texture.rs 中添加一个函数来创建深度纹理。
impl Texture {
    pub const DEPTH_FORMAT: wgpu::TextureFormat = wgpu::TextureFormat::Depth32Float; // 1.

    pub fn create_depth_texture(device: &wgpu::Device, config: &wgpu::SurfaceConfiguration, label: &str) -> Self {
        let size = wgpu::Extent3d { // 2.
            width: config.width,
            height: config.height,
            depth_or_array_layers: 1,
        };
        let desc = wgpu::TextureDescriptor {
            label: Some(label),
            size,
            mip_level_count: 1,
            sample_count: 1,
            dimension: wgpu::TextureDimension::D2,
            format: Self::DEPTH_FORMAT,
            usage: wgpu::TextureUsages::RENDER_ATTACHMENT // 3.
                | wgpu::TextureUsages::TEXTURE_BINDING,
            view_formats: &[],
        };
        let texture = device.create_texture(&desc);

        let view = texture.create_view(&wgpu::TextureViewDescriptor::default());
        let sampler = device.create_sampler(
            &wgpu::SamplerDescriptor { // 4.
                address_mode_u: wgpu::AddressMode::ClampToEdge,
                address_mode_v: wgpu::AddressMode::ClampToEdge,
                address_mode_w: wgpu::AddressMode::ClampToEdge,
                mag_filter: wgpu::FilterMode::Linear,
                min_filter: wgpu::FilterMode::Linear,
                mipmap_filter: wgpu::MipmapFilterMode::Nearest,
                compare: Some(wgpu::CompareFunction::LessEqual), // 5.
                lod_min_clamp: 0.0,
                lod_max_clamp: 200.0,
                ..Default::default()
            }
        );

        Self { texture, view, sampler }
    }
}- 定义 DEPTH_FORMAT 用于创建深度纹理及
render_pipeline需要的DepthStencilState对象。 - 深度纹理的宽高需要与展示平面一致(更准确的说,是需要与当前的 Color Attachment 一致)。我们传入展示平面使用的
config参数来确保它们的宽高相同。 - 由于要对这个纹理进行渲染,我们需要给它添加
RENDER_ATTACHMENT使用范围标志。 - 从技术的角度来看,我们不需要深度纹理的采样器,是我们的
Texture结构体需要它。
现在在 WgpuApp::new() 中创建我们的 depth_texture:
let depth_texture = texture::Texture::create_depth_texture(&device, &config, "depth_texture");然后修改渲染管线以启用深度测试:
let render_pipeline = device.create_render_pipeline(&wgpu::RenderPipelineDescriptor {
    // ...
    depth_stencil: Some(wgpu::DepthStencilState {
        format: texture::Texture::DEPTH_FORMAT,
        depth_write_enabled: Some(true),
        depth_compare: Some(wgpu::CompareFunction::Less), // 1.
        stencil: wgpu::StencilState::default(), // 2.
        bias: wgpu::DepthBiasState::default(),
    }),
    // ...
});depth_compare字段指定通过深度测试的条件。使用LESS意味着像素将被从后往前绘制,大于当前位置的深度值的像素将被丢弃。下面是可选的所有枚举值:
#[repr(C)]
#[derive(Copy, Clone, Debug, Hash, Eq, PartialEq)]
#[cfg_attr(feature = "serde", derive(Serialize, Deserialize))]
pub enum CompareFunction {
    Undefined = 0,
    Never = 1,
    Less = 2,
    Equal = 3,
    LessEqual = 4,
    Greater = 5,
    NotEqual = 6,
    GreaterEqual = 7,
    Always = 8,
}- 还有一种类型的缓冲区叫做模版缓冲区(Stencil Buffer)。模版缓冲区和深度缓冲区通常被存储在同一个纹理中。这些字段控制着模版测试的数值。目前我们没有使用模版缓冲区,这里就使用默认值。在以后教程中再详情介绍模版缓冲区。
不要忘了在 WgpuApp 中存储 depth_texture:
Self {
    // ...
    depth_texture,
}还要记得修改 resize_surface_if_needed() 函数来更新深度纹理及它的纹理视图:
/// 必要的时候调整 surface 大小
fn resize_surface_if_needed(&mut self) {
    if self.size_changed {
        //...
        // NEW!
        self.depth_texture = texture::Texture::create_depth_texture(
            &self.app.device,
            &self.app.config,
            "depth_texture",
        );
        // ...
    }
}请确保更新了 config 之后一定要更新 depth_texture,否则程序就会崩溃,因为此时 depth_texture 与surface 纹理的宽高已经不一致了(还记得上边提到过的 “深度纹理的宽高需要与展示平面一致” 吗?)。
最后是修改 render() 函数,我们已经创建了深度纹理,但目前还没有使用。只需把它绑定到渲染通道的depth_stencil_attachment 字段即可:
let mut render_pass = encoder.begin_render_pass(&wgpu::RenderPassDescriptor {
    // ...
    depth_stencil_attachment: Some(wgpu::RenderPassDepthStencilAttachment {
        view: &self.depth_texture.view,
        depth_ops: Some(wgpu::Operations {
            load: wgpu::LoadOp::Clear(1.0),
            store: wgpu::StoreOp::Store
        }),
        stencil_ops: None,
    }),
    ..Default::default()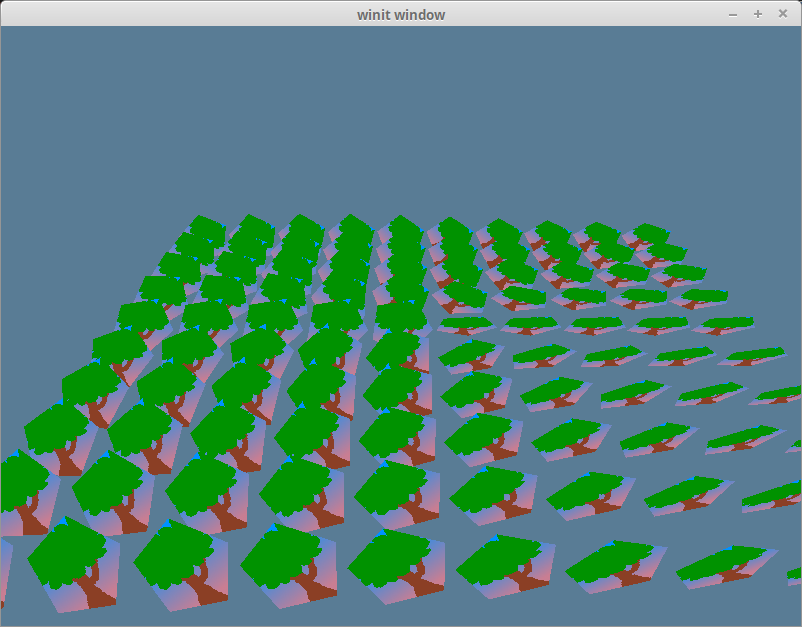
});这就是我们所要做的!不涉及着色器代码!现在运行该应用程序,将看到深度问题已不复存在:
挑战
深度缓冲区是一张纹理,所以我们可以在着色器中对其采样。请为深度纹理创建一个绑定组(或重用现有的),并将其渲染到屏幕上。